
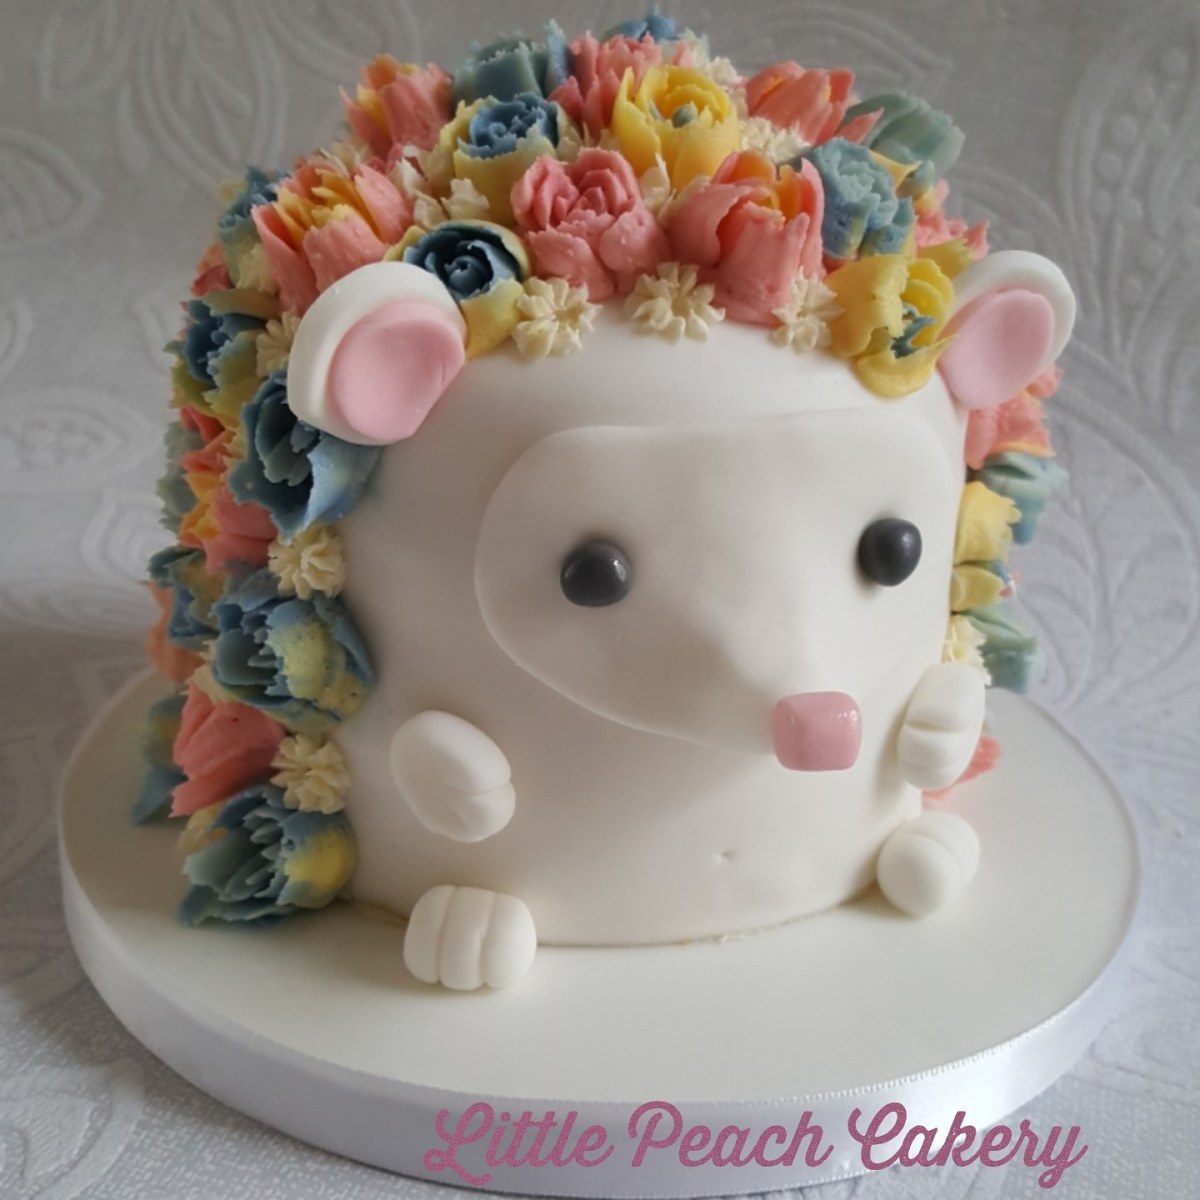
How to make a cute Hedgehog Cake with buttercream flowers as spikes.
This is an original cake design by Little Peach Cakery. I hope you enjoy creating your own little hedgehog cake.
You will need:
Sugarcraft tools – rolling pin, knife, cake smoother, ball tool, small rose petal or circle cutters.
A 5 inch round maderia cake, approx 5 inch tall and domed top.
8 inch cake board and ribbon
2 nifty nozzles, 2 drop flower tips
strong piping bags
Buttercream (1:2 butter and icing sugar)
Sugarpaste
Tylo powder or modelling paste
Food colour gel or paste
Edible glaze (optional)
Method:
1. Bake your cake, let it cool. Cut into 4 even layers.
2. To make the face of the hedgehog first add a little tylo to the sugarpaste to make modelling paste. Make a ball into a point and then with the point upwards squash the ball and use a small rolling pin to flatten the eye area. Cut the shape of the face out.

Make two pea sizes balls for the eyes. And a small square for the nose. I like to add a little edible food gloss to these.

The hands and feet are shaped and marked with a small knife.
I use two rose petal cutters for the ears. The larger using white modelling paste and smaller for cutting the pink modelling paste. I cut a few mm off the bottom of the ears where they will be glued onto the cake.
3. Add buttercream between the cake layers and add a thin coat of buttercream over the whole cake. Smoothing over the dome top. This can be natural dome or carved depending on how the cake has risen.

4. Roll out enough sugarpaste to cover half the cake. Smooth this over the front of the cake. Trim off any excess. Carefully transfer the cake onto a sugarpaste covered cake board.
5. Using edible glue attach the face and nose to the cake. You may want to use a cocktail stick to help hold in place.

6. Add the hands and feet using edible glue. Make a little hole as a belly button. Make 2 indents on the face and add the eyes.
7. Place the ears but do not attach yet. Make a note where they will sit and remove them for now.
8. Mix up several different colours of buttercream. You can add more than one colour to the piping bags to give different tones to the flowers. I like to make the smaller drop flowers white like daisies.
Tip: the buttercream needs to be firm but still able to pipe. Strong piping bags are needed. If the buttercream gets too warm whilst piping flowers pop it in the fridge for 5 mins and try again.

9. Start piping the nifty flowers onto the cake randomly. If you run out of buttercream try adding a different colour buttercream to the bag to give variety to the flowers.

10. Next add the drop flowers to any spaces between the larger flowers.

11. Glue the ears onto the cake.

12. Add a ribbon to the cake board.
And done! Of course you can use different nozzles to create the flowers. And use any colour combinations. I also use elderflower flavoured buttercream to add a more floral taste! I hope you enjoy creating your own cake. Thank you
